20 October 2026, 15:34
Loading...
How can solar power and batteries help make a Czech campervan energy self-sufficient?
Michal Klečka
17 June 2021, 14:30
The option of going on holiday with family or friends even when standard accommodation facilities are closed or their operation is restricted has become highly relevant in recent months. So, if you are buying a campervan or, given their shortage, converting a van into one, this article is just for you. In that case, it is worth considering how to design the electrical installation and energy balance of the motorhome. This article answers all the key related questions by guiding you through one van-to-camper conversion story. You will learn why a particular solution was chosen, while the article also outlines ways in which everything could have been done differently.
Dependence vs. independence from a grid connection
If you plan to use a grid connection, the electrical installation will consist primarily of 230V AC (alternating current) sockets and lights. Alternatives to a grid connection include a generator or a 12V DC (direct current)/230V AC battery inverter, which you would connect to the input in place of the grid connection, usually only for short periods. The electrical installation and appliances will then be the same or similar to those you have at home.
If you want to be as independent as possible from external electricity, you will choose an electrical installation and appliances so that you do not need to convert from 12V DC to 230V AC (and partly back again). The entire system will therefore mostly use 12V DC, for which standardised sockets and appliances are also available. A DC/AC inverter with a standard IEC / Schuko socket can then serve just one 230V appliance connected via a flexible lead, or extension cable. DC and AC systems can, of course, be combined to varying degrees or used side by side in a campervan.
Our model campervan will set off on an expedition through remote corners of Europe, where 230V connections cannot be expected. The aim was to achieve the greatest possible independence. We therefore opted for a 12V appliance system with several battery charging sources and a single 230V inverter socket intended for the flexible connection of various portable appliances.
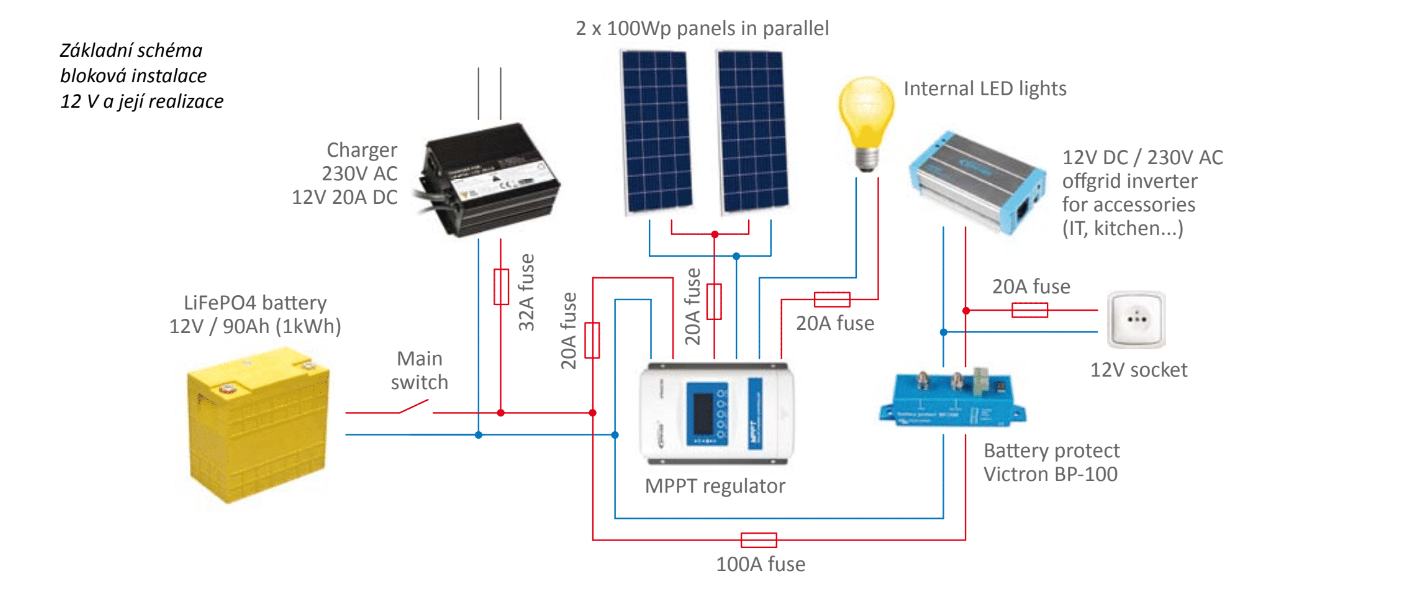
Basic diagram of a 12 V electrical installation and its implementation
Simple vs. sophisticated system
To begin with, it should be noted that whichever option you choose, a motorhome must always have two separate batteries: a conventional lead-acid starter battery and a separate one for the living area. Lead-acid or lithium batteries intended for power tools or e-bikes are not suitable for this campervan traction battery under any circumstances; only lithium iron phosphate batteries, designated LiFePO4, should be used. Although they are completely resistant to fire and explosion, they need to be protected against damage from overcharging or deep discharge. This is handled by battery protection, the details of which are described for interested readers in the free ebook linked at the end of this article. A LiFePO4 battery cannot be installed in a campervan without this protection!
If you choose a simple system, you can more easily become familiar, according to your abilities, with the system's basic components and overall operation. You will learn to read the required values from graphical indicators or numerical values on the display directly in the campervan. Based on the knowledge and experience gained, you will above all determine for yourself how to use the electrical installation and what needs to be done. The system's automatic functions will then be limited, for example, to protecting the battery against hazardous conditions, circuit overloads, etc. If you are more technically proficient, you will be able to identify a fault (a defective component) and, after consulting an expert by phone, carry out a repair or replacement. This applies particularly to systems using safe 12V voltage.
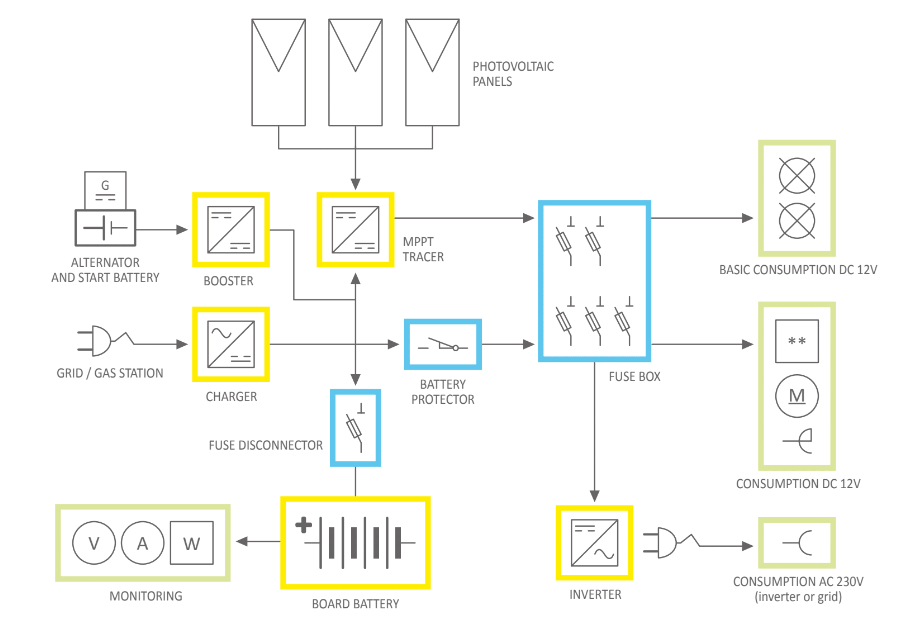
Block diagram of the electrical installation of the campervan described
But a campervan can also be turned into a "smart home" to a considerable extent. In that case, the system will keep you informed about everything, for example through a mobile app with SMS alerts, its own touchscreen display and similar modern channels. It will do most tasks for you (monitor weather forecasts, limit consumption, select the battery charging mode, and even start the generator). This solution will be convenient and expensive, and you will generally have to entrust servicing entirely to a specialist company.
In our conversion, we had already chosen a fully independent 12V DC system. However, the user also wants to be as independent as possible from a service company. While they do not have electrical engineering qualifications, they are willing (and therefore able) to understand the system to a reasonable extent and operate it fully. Essentially, only basic school-level electrical knowledge is required. We therefore decided on a simple system consisting of easily replaceable and readily available components, operated mostly manually based on displayed data.
Which photovoltaic panels to use, and where and how to mount them?
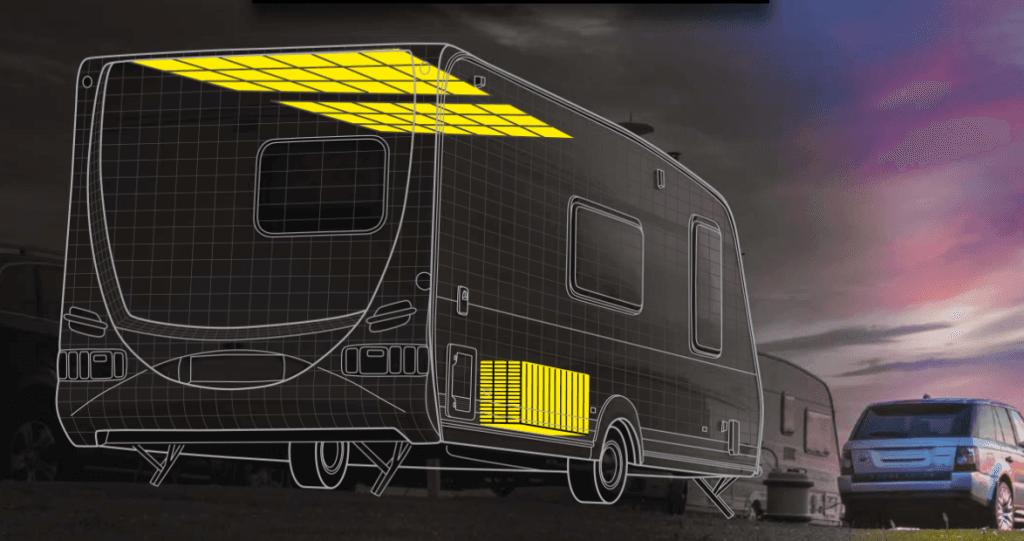
Panels installed horizontally on the roof generally do not reach 100% output, but in summer they have a long, flat generation curve, which is beneficial for basic energy yield.
Installing them on a sloping part of the campervan means potentially higher output, although unevenly distributed throughout the day. To achieve maximum yields in this case, attention must be paid to the appropriate orientation of the panels, which is not always practically feasible.

Source: GWL - ELECTRICAL INSTALLATION IN A CAMPERVAN: 7 questions and answers.
FLEXIBLE PANELS
Frameless flexible panels can be used for campervans. Their advantages are flexibility of shape (albeit limited), relatively easy installation and minimal overhang beyond the campervan's outline. However, ventilation of the underside of the panel usually needs to be ensured and the differing thermal expansion of the panel and substrate eliminated. For example, an intermediate layer of durable Makrolon (polycarbonate) is suitable.
STANDARD RIGID PANELS
Conventional framed panels can also be used effectively, particularly on a campervan roof. Their advantages are a wide choice of shapes and outputs and a more favourable price, while the disadvantage is poorer aerodynamics. For mounting on a flat surface, corner brackets are available, for example. There are also many different aluminium profiles that can be fixed to the campervan body and used for subsequent panel installation.
In the example conversion, we were able to use a roof area of approximately 140 x 200 cm. We therefore used 3 conventional 160 Wp aluminium-framed panels measuring 140 x 65 cm. Aluminium profiles originally intended for trapezoidal roof sheets served well to mount them. We embedded them in sealant and secured them with screws into threaded body rivets.
Which battery to use, and how and where to install it?
When selecting a specific battery type and its capacity, the following criteria in particular need to be taken into account:
- Electrical consumption over a daily/multi-day cycle.
- The possibility of connection to additional sources (the vehicle alternator, generator, grid, etc.).
- Generation from PV panels over a daily/multi-day cycle.
- The maximum power draw of the electrical installation (battery current load).
- Battery life (number of cycles, depth of discharge, etc.).
- The space and weight limits available for the battery.
The calculation of power draw and consumption for the example campervan is shown in the following table.
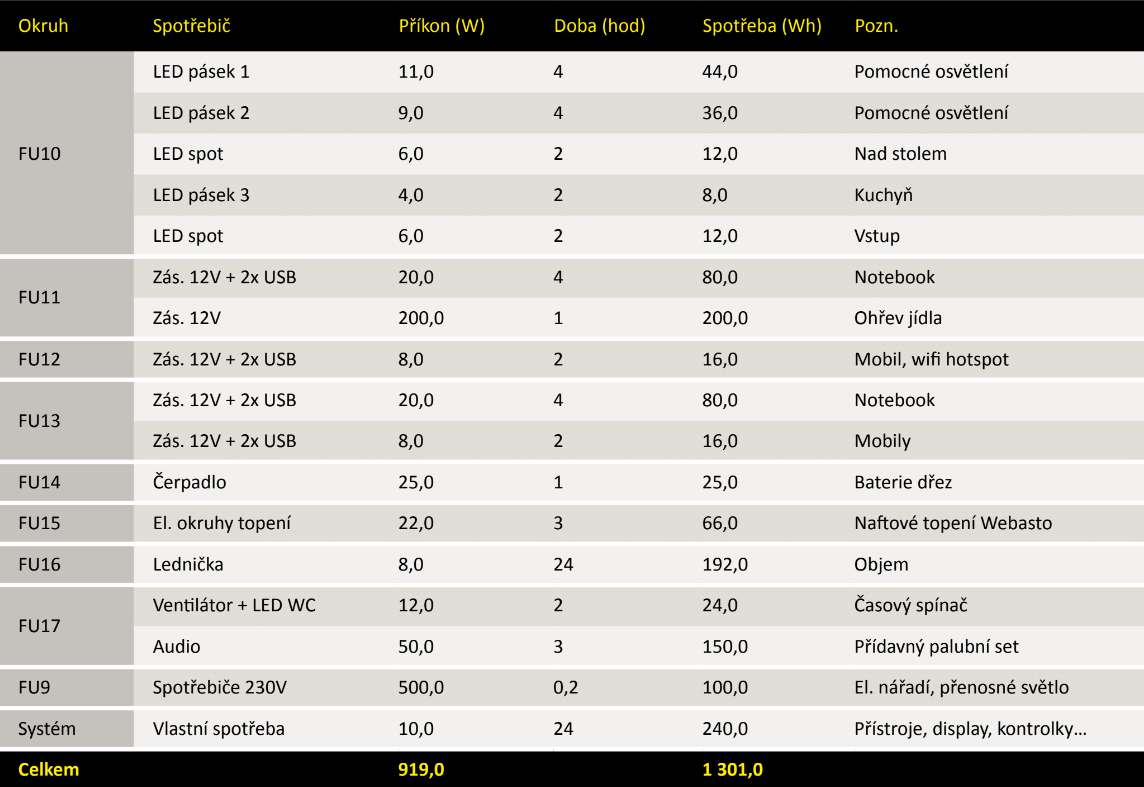
Source: GWL - ELECTRICAL INSTALLATION IN A CAMPERVAN: 7 questions and answers.
The greater the capacity reserve added after calculation, the better (unexpected situations, expansion of the installation, low temperatures, etc.). The battery must be located in a safe place in terms of mechanical damage in an accident, excessive temperatures, and exposure to water, dust, insects and rodents. Protection against the cells "swelling" during short-term overload, discharge or overcharge is also advisable.
Individual cells need to be properly secured together, and original interconnects and terminal caps should be used to connect them. Ideally, use a purpose-built box, or at least a tightening set, and then place and secure the battery in a purpose-built lockable space. Such securing boxes can be bought ready-made or at various stages of preparation.
In the example conversion, based on the above calculations, we decided on a battery assembled from 4 LiFePO4 300Ah cells. We therefore have 3,6 kWh of storage, enough for three days of full independence in a critical situation. In normal summer operation, however, consumption can be expected to be fully covered by photovoltaic panels on a daily cycle, partly directly. The daily battery cycle will thus be only 0,5 – 0,8 kWh, providing a generous reserve for higher consumption or an unexpected energy requirement.
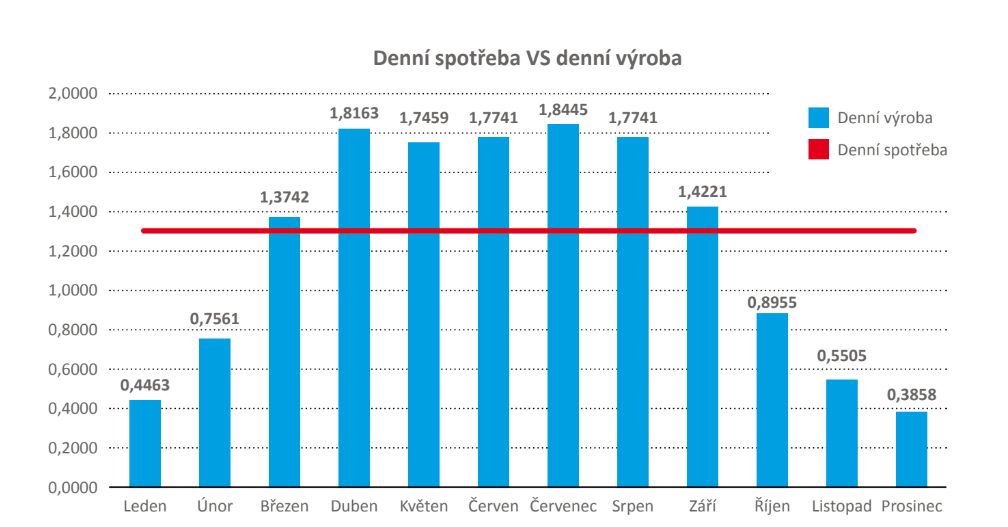
Chart: calculation of the example campervan's self-sufficiency from photovoltaics (horizontal 480Wp PV array, Central Europe).
Principles of correct installation
The main nodes of the entire installation are the battery, distribution board (fuse box) and monitoring panel. In a small installation, these parts are usually located in one space, which should be easily accessible. At the 12V voltage level, high currents must be expected, so attention should be paid to sufficient conductor cross-sections and the shortest possible cable lengths; in other words, the individual nodes should be close together from the system design stage.
We use properly colour-coded and terminated stranded conductors, protected in routes and passages by conduits, spiral sleeving, etc. Securing them against chafing and other damage that may arise from vehicle operation, especially vibration, is important. Each circuit should have its own protective device, preferably one that can be easily disconnected mechanically. Safe and accessible disconnection of the PV panels and battery is a matter of course. We always begin commissioning the system with a charged and balanced battery. We gradually connect the monitoring system and individual consumption circuits. We monitor voltage and current values, the heating of connections (an infrared camera is suitable), conductors, devices, etc. After partially discharging the battery, we proceed similarly when testing the charging components and setting their parameters.
In our installation, a separate space for the battery and its extension was created in a safe part of the vehicle. Nearby, in an accessible location, there is space for a distribution board made up of electrical components installed on a DIN rail. The monitoring panel is on the distribution board door and the main devices are on the adjacent toilet wall. The wiring is installed in electrical conduits and trunking hidden behind wooden panelling.
How to operate and maintain the system
PROJECT DOCUMENTATION AND DEVICE MANUALS
A place should be set aside in the campervan for the secure storage of all documentation required by users and professional service personnel. It is also advisable to place the electrical installation diagram, for example, on the inside of the distribution board door. If professional assistance from an electrician is needed on the road, it will be the first thing they want to see.
SERVICE KIT, CONTACTS
It is advisable to have spare fuses, insulating tape, cable ties, electrical terminal blocks and a simple multimeter on board. You can resolve some minor faults and accidents yourself, or for example by video call with an expert. They will always appreciate the technical equipment and any level of user training with the operating system. If you do not have such a "friend on the phone", at least have a recommendation for a service provider in the country concerned.
ROUTINE MAINTENANCE
It is recommended to check the following at least once a month (the more often, the better):
- measure the voltage of individual battery cells (address values below 3V and above 3,6V)
- visually inspect the battery's condition (contact between conductors and balancer resistors, loose components, etc.)
- check the mounting of PV panels and their structure
- pay attention to conspicuous heating of devices and connections in 12V power circuits (battery terminals, Battery Protect, circuit breakers, inverter, terminals, etc.)
Source: GWL - ELECTRICAL INSTALLATION IN A CAMPERVAN: 7 questions and answers.
POST-SEASON MAINTENANCE
- charge the battery and reliably disconnect it mechanically from all loads; ideally, store it at room temperature (not necessary for LiFePO4 cells, such as Winston or Elerix brands)
- carry out battery check measurements, ideally once a month (to eliminate possible failure of the monitoring system and subsequent battery discharge through its own consumption – address values below 3,2 V per cell)
- protect the electrical installation against damage by rodents and insects
- charge the battery approximately once every three months; before the season, charge and balance the cells
- before the season, check the overall condition of the installation (ideally by an expert)
SAFETY
- it is advisable to install a smoke detector in the campervan, battery compartment and near circuit breakers
- mount all active electrical components on non-flammable backing materials (e.g. CEMVIN)
- keep a functional powder fire extinguisher in a visible and accessible place
- protect the battery against mechanical damage and possible swelling
- prevent children and uninstructed persons from handling the electrical installation and electrical equipment
How does it work in practice?
Completion of the example conversion coincided with the onset of the coronavirus pandemic in spring 2020 and fears that borders would soon close. The travel-minded family therefore did not wait and, with a campervan that was not yet fully completed or tested, set off from the Czech Republic for their destination: Portugal. They encountered closed borders (and campsites with electricity connections) between France and Spain. The choice of an independent and self-sufficient electrical installation thus proved highly suitable and functional.
The campervan's normal daily consumption was exactly as calculated: 1 kWh. It showed how useful it is to plan and calculate everything in advance. For most of the journey, therefore, the battery only needed charging from the PV panels, which the campervan's occupants quickly became accustomed to, and they stopped worrying about charging and conserving energy. In rainy weather in Normandy, after extended cooking, heating (operation of the diesel unit's fan), watching films on tablets, etc., the lights "suddenly" went out. However, the other electrical appliances continued working, including lamps plugged into sockets. But everyone noticed that the lights had gone out: "Why did they go out?"
It turned out that the safely set (higher) battery voltage threshold for switching off the lighting circuits was a very effective "warning light" before a complete campervan blackout. The users were thus reminded in time that they needed to start conserving energy and drive somewhere again to recharge the battery – at least via the alternator and booster for the time being. This was at the end of March. With the April and May sunshine, the situation did not recur and there is no need to worry about it until October.
On simple energy meters, the travellers were more likely to see surplus energy, so they bought more and more small appliances along the way, such as a 12V kettle and vacuum cleaner. Before they learned to spread consumption across several sockets, the overloaded fuse tripped around twice. These were the only "complications" on a journey of approximately 6 000 kilometres. In May, the campervan returned to the Czech Republic, so we carried out a service inspection and listened to the users' comments about backlit USB sockets, whose glow is disturbing at night. We therefore added a switch to these circuits, and when non-backlit ones can be sourced, they will be easy to replace. Otherwise, there was nothing to service: the battery was perfectly balanced, the devices were operational, and the system owner understood more than we had expected... In July 2020, the campervan again disappeared beyond the border and, after a week, reported in from Braga in Portugal – everything OK. Hopefully, then, this good story of one installation will continue. We wish you many happy kilometres, discoveries and experiences!
Technical details that did not fit into the article are available in the full version of the brochure here:
ELECTRICAL INSTALLATION IN A CAMPERVAN: 7 questions and answers.
Translation disclaimer
This article is a machine translation of the Czech original and has not yet been fully reviewed. In case of any doubt, please refer to the Czech version.
Sdílejte článek prostřednictvím:
You might also like


20 October 2026, 12:55
20 October 2026, 10:49

20 October 2026, 06:13